Pages

Showing posts with label GridView. Show all posts

Wednesday, 4 August 2010

GridView and HyperLinkField

It’s been a while since I use the GridView control to display data and I just realize that I have never used the HyperLinkField to provide a link to another page with the data from the the database. Every time I needed to do so, I always use a TemplateField with an HyperLink control.

Well with the HyperLinkField, is so easy to provide a link with the data needed in query string! As an example, lets say I want to give a link to the user to display customer information from an order. We would have two web pages, one page showing the orders from the Northwind database and another page that display the customer information from an order. The customer information page will display the customer data from the customer id send via the query string parameter.

In the past, I would have used a TemplateField to provide a link for the customer information like this:
   1: <asp:TemplateField HeaderText="CustomerID" SortExpression="CustomerID">
   2:    <ItemTemplate>
   3:       <asp:HyperLink ID="HyperLink1" runat="server"
   4:          NavigateUrl='<%# "~/CustomerInfo.aspx?CustId=" 
   5:             + DataBinder.Eval(Container.DataItem, "CustomerID") %>'
   6:          Text='<%# Bind("CustomerID") %>' Target="_blank"></asp:HyperLink>
   7:    </ItemTemplate>
   8: </asp:TemplateField>

Here is how to get the same result by using an HyperLinkField and setting the DataNavigateUrlFields and DataNavigateUrlFormatString properties:


   1: <asp:HyperLinkField HeaderText="CustomerID" DataTextField="CustomerId" 
   2:     DataNavigateUrlFields="CustomerId"
   3:     DataNavigateUrlFormatString="~/CustomerInfo.aspx?CustId={0}"  
   4:     Target="_blank" />

The end result is exactly the same but the it is a lot easier to use the HyperLinkField than the TemplateField!

Regards,

Bruno

Monday, 2 August 2010

Use DataFormatString to format GridView fields

In a previous post, is show you how to use the GridView DataKeys property to retrieve multiple  information about the selected row. In this post, I will show you how to format GridView fields using the DataFormatString attribute. Lets start with two simples GridView showing the orders and order details from the Northwind sample database.
image

Currency fields

Lets start by formatting the “Freight” field from the orders and the “UnitPrice” field from the order details into currency. The formatting string used by the DataFormatString property can be any literal string. Usually, it will includes a placeholder for the field’s value. The placeholder consists of two parts separated by a colon and wrapped in braces like this: {A:Bxx}. The value before the colon represents the field value’s index but since there is only one field value in each grid view cells, this value will always be 0. The character after the colon is optional and specifies the format to display the value in. The value after the format character specifies the number of significant digits or decimal places to display.

If we do not specified any value, it will take the default value from the settings in the Regional and Language Options item in the Control Panel. Since the character to displays numeric values in currency format is ‘C’, and my default number of digits after the decimal is set to two, I can set the DataFormatString for the freight and unit price field to “{0:c}”.

image
To set the value of the DataFormatString property, we can either edit the fields from the GridView smart tag “Edit columns” options or set the value manually from the source window.
image 
   1: <asp:BoundField DataField="Freight" DataFormatString="{0:c}" 
   2:       HeaderText="Freight" SortExpression="Freight" />

If we want to display the unit price with 4 decimals, all we have to do is to specify the number of digits after the decimal like this: “{0:c4}”.


   1: <asp:BoundField DataField="UnitPrice" DataFormatString="{0:c4}"
   2:       HeaderText="UnitPrice" SortExpression="UnitPrice" />
This will produce the following output:

image

Date and time fields

Now, to format date and time fields, we can specify our own format string with characters like ‘d’, ‘M’ and ‘y’ like this “{0:yyyy/MM/dd}”. We can also refer to the following table that list the most common format string used to format date and time:

Format PatternNameExample
d
Short date pattern
8/16/2010
D
Long date pattern
Monday, August 16, 2010
t
Short time pattern
2:42 PM
TLong time pattern2:42:00 PM
fFull date/time pattern (short time)Monday, August 16, 2010 2:42 PM
F
Full date/time pattern (long time)
Monday, August 16, 2010 2:42:00 PM
gGeneral date/time pattern (short time)8/16/2010 2:42 PM
GGeneral date/time pattern (long time)8/16/2010 2:42:00 PM
m or MMonth day patternAugust 16
r or RRFC1123 patternMon, 16 Aug 2010 14:42:00 GMT
y or YYear month patternAugust, 2010

Therefore, by setting DataFormatString of the date fields OrderDate, RequiredDate and ShippedDate like this:


   1: <asp:BoundField DataField="OrderDate"DataFormatString="{0:f}"
   2:    HeaderText="OrderDate" SortExpression="OrderDate" />
   3: <asp:BoundField DataField="RequiredDate" DataFormatString="{0:yyyy/MM/dd}"
   4:    HeaderText="RequiredDate" SortExpression="RequiredDate" />
   5: <asp:BoundField DataField="ShippedDate" DataFormatString="{0:D}"
   6:    HeaderText="ShippedDate" SortExpression="ShippedDate" />

We now have the following display:

image

Again, this is important to remember that the output is based on the settings in the Regional and Language Options item in the Control Panel. Here is how it look like for me:

image

I hope this will help you,

Bruno

Sunday, 1 August 2010

Master details with multiple data keys

In this post, I will show you how simple it is to get many information from a single ASP.Net grid view control. To do that, we will use the Northwind sample database.

Let start first with a simple web page with only a GridView and a SqlDataSource. We use the GridView to display the data from the Orders table. After applying a little bit of style to the GridView, the web form should look like this:

image

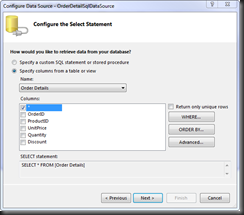
Now that we have our orders displayed, the first thing we might want to show when selecting an order is the details of that selected order. To do that, we simply drag another GridView controls from the toolbox to the design surface. We use a GridView since we want to display all the order details at the same time. From the GridView smart tag, we add a new SqlDataSource and we select all fields from the “Order Details” table like this:
image

Then, we select the “Where” option to specify that the OrderID field should be equals to the selected OrderID of the orders GridView control.

image

From the previous screen shot, we can see that the value will be the “SelectedValue” property of the orders GridView control. Click Add and then OK, Next and Finish to complete the data source configuration wizard.

Now, we can view our web page in the browser to see if everything is working fine.

image  image

Good. From the above captures, we can see that everything work has expected. But maybe you don’t really know why!! Well if you remember, we have set the source of the select parameters for the order details data source to the property SelectedValue of our master grid view. That return the value of the first key field of the selected row. If we look at the source of our master grid view, we can remark that the DataKeyNames for that grid view is set to “OrderId”. That means that the SelectedValue property of our grid view will return the OrderId of the grid view selected row.

image

Now, what if we want to display also the customer information for the selected order? We can add a DetailsView control to the web form and again, use the smart tag to configure the data source. This time, we want to display data from the Customer table.

image

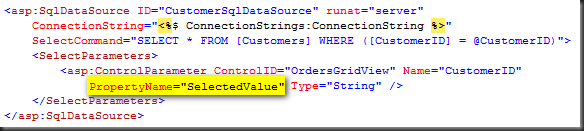
Again, for the where clause, we should specify that the CustomerId column should be equal to the orders grid view control SelectedDataKeys property. The only problem is that we cannot change source value from the wizard and by default, it uses the grid view SelectedValue property.

image

How can we change this value? Well even if we are using the data source configuration wizard, it doesn’t mean that we cannot change manually the code that was generated from the wizard! So let’s change the the property name of the select parameters from SelectedValue to SelectedDataKey.Value[CustomerId].
image

image

Now, if we look at the page in the browser and we select an order, you should have the following result:

image

You can notice that we don’t have the customer information displayed. The reason is simple, the master grid view does not have the CustomerID in his data keys. All we have to do is to add it in the grid view DataKeyNames attribute like this:

image

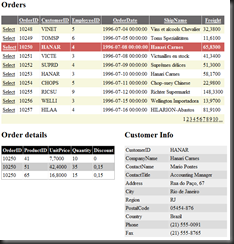
And now, we have the order details and customer information for the selected order.
image

Now, if I ask you how I can display the Employee information for the selected order, I’m pretty sure you all know how to do it! :)

Regards,

Bruno